Jira Scope
AutomatR.Jira.Activities.JiraScope
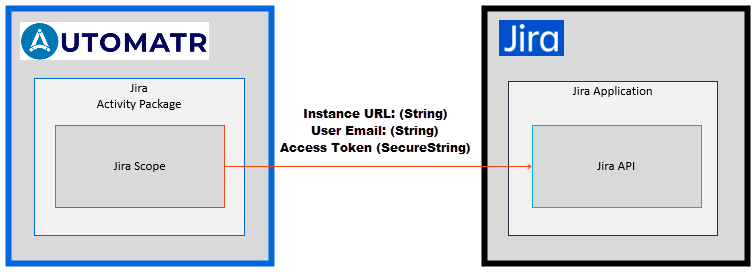
The "Jira Scope" activity in AutomatR's Jira package establishes a connection between AutomatR and your Jira environment using Token Authentication. This connection authorizes a robot to call Jira APIs and access resources on your behalf. The activity creates a scoped environment for Jira-related activities within your workflow.
The Jira Scope activity establishes a connection to a specified Jira instance and provides a scope for all subsequent activities.
Prerequisite
To obtain an Access Token from Jira, you need to follow these steps:
Log in to your Jira account as an administrator or a user with administrative privileges.
Navigate to the Jira settings by clicking on the "Settings" gear icon in the top-right corner and selecting "System" from the dropdown menu.
In the System settings, locate and click on "OAuth (under Jira Settings)."
On the OAuth settings page, click on "Add Consumer" or "Create and link your app now" to create a new OAuth consumer or app.
Provide a name for your OAuth consumer or app. This name is for identification purposes and can be any name you choose.
Fill in the required information, such as the "Callback URL" (where the authorization response will be sent), "Description," and "URL."
Configure the permissions or scopes for the OAuth consumer or app based on your requirements. Scopes define the access level and permissions your app will have when making API requests. Select the appropriate scopes for your use case.
Once you have completed the configuration, click on the "Save" or "Create" button to create the OAuth consumer or app.
After saving, you can see the generated
Access Tokenfor your Jira app. This token can be used for authentication in AutomatR when making API requests to the Jira API.
NOTE: Make sure to securely store your
Access Tokenand treat it as sensitive information. Do not share it publicly or expose it in your application's source code.
NOTE: The steps provided are based on the information available up to the cutoff in September 2021. The Jira website and interface may have been updated since then, so it's recommended to refer to the official Jira documentation for the most up-to-date instructions on obtaining an
Access Token.
For more information and before you build your first automation project, see the Jira Setup procedure.
- Enter the URL of your Jira server (Instance URL) into the Jira Scope activity
- Enter your Token Credentials (Access Token and User email) to complete the information needed to establish an authenticated connection to your Jira application.
- After establishing a connection, a parent Jira Scope activity can output a record of the connection in a
Jira Connectionobject (Jira Connection) that you can use in subsequent child scope activities.
The following steps and message sequence diagram is an example of how the activity works from design time (i.e., the activity dependencies and input/output properties) to run time.
- Add the Jira Scope activity to your project.
- Enter the Access Token Authentication value in the input properties.
- Enter the Jira Instance URL and email address in the input properties.

Properties
| Name | Description |
|---|---|
| Input | |
| Access Token | Enter the API access token when authentication type is API Authentication. String variables containing the API access token. |
| Instance URL | Enter the URL of the Jira site to work with activities. String variables containing the Jira site URL. |
| User Email | Enter the email address linked to the Jira account. String variables containing the user's email. |
| Misc | |
| Display Name | The display name of the activity. This field supports only strings or String variables. |
| Body | Represents the sequence of activities to be executed within the Jira scope. Drag and drop other Jira activities into this sequence to perform operations within the scoped Jira environment. |
| Optional | |
| Delay | Specifies the amount of time (in seconds) to wait before executing the "Jira Scope" activity. This can be useful for handling synchronization issues. Integer variables containing the delay duration. Ex.: If the amount of time is 1000 milliseconds or 1 sec, i.e., 1. |
How to use:
- Drag and drop the "Jira Scope" activity onto the workflow.
- Configure the properties by providing the user email, API access token, and Jira site URL.
- Optionally, configure the delay.
- Drag and drop other Jira activities into the "Body" to perform operations within the scoped Jira environment.
- Execute the workflow to establish a connection and perform Jira activities.
Example: Consider an example where the "Jira Scope" activity is used to establish a connection to the Jira environment:
Jira Scope:
  User Email: "user@example.com"
  Access Token: "your-api-token"
  Instance URL: "https://your-jira-instance.com"
  Body:
    - Get User
    - Create Issue
    - Transition Issue
In this example, the "Jira Scope" activity establishes a connection using the provided user email, API access token, and Jira site URL. Subsequent Jira activities (e.g., Get User, Create Issue, Transition Issue) are placed within the "Body" to execute operations within the scoped Jira environment.